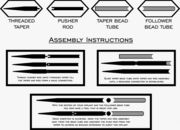
Beading Tool
A beading tool is a combination of a threaded taper and implant guide rods. It is used to place the implants under the skin, probably the most common form of this is genital beading. Implants generally are made of high grade steel or titanium.
A rough description of the procedure is as follows:
1. The site of the implant is decided upon, centered and marked up, then the insertion point [usually about 5cm away] is decided upon, an exit point is also decided upon, this will always be directly opposite the entry point, in line with the implant site.
2. Using a scalpel, cuts are made at the entry and exit points, a cavity is created and a taper [connected to an insertion rod with ball and pusher rod assembly, as shown in the diagram] is inserted. When the ball is on the implant site, the taper is removed and the two rods are used to 'fine tune' the positioning of the ball.
3. The two rods are then removed and the air is pressed out of the cavity, the entry and exit cuts are then sutured shut [if required].
4. Quite often a pressure bandage is used for the first week or more to maintain the position of the implant. Preventing it from moving around.
This tool can be found in the BMEshop here
Implants that are improperly placed can often shift around under the skin, they can also cut off blood supply to the area directly beneath them causing tissue damage. There is also a strong risk of implant rejection, the body will try to either relocate the implant or to eject it upwards through the skin.
